📂 License
- 📄 Can I use a single license on multiple site at the same time?
- 📄 How do I cancel license renewal?
- 📄 How to upgrade my license?
- 📄 I paid for the renewal but still the notice shows on my site. How to solve this?
- 📄 How can I install and activate CoDesigner and CoDesigner Pro on my website?
- 📄 How to renew my license?
- 📄 I can’t activate my license, what to do?
- 📄 I want to reset my password. How to do that?
- 📄 What happens if my license expires?
- 📄 If I buy a single license, can I use it on a test domain and move it on an official domain later?
📂 Troubleshooting
- 📄 My site doesn't show the update notice, what to do?
- 📄 I can't activate my license, what to do?
- 📄 CoDesigner Pro stopped working and cannot be updated. What to do?
- 📄 Issue with Pagination on Shop Page, what to do?
- 📄 I can’t activate my license, what to do?
- 📄 Elementor editor is loading continuously, how to fix it?
- 📄 My Checkout page isn't working
- 📄 How to create and edit a new checkout page while keeping the current checkout page live?
- 📄 Text are not appearing on Buttons Created using Font Awesome and CoDesigner, what to do?
- 📄 Why am I getting an error message while editing the checkout page with Elementor?
📂 CoDesigner Modules
📂 CoDesigner Customization
- 📄 How do I design My Shop Page using Shop Classic?
- 📄 How can I design my shop page using the Shop Standard widget?
- 📄 How can I design my shop page using the Shop Curvy widget?
- 📄 How can I design my shop page using the Shop Slider widget?
- 📄 How can I design my shop page using the Shop Flip widget?
- 📄 How can I design my shop page using the Shop Trendy widget?
- 📄 How do I design My Shop Page using Shop Curvy Horizontal Widget?
- 📄 How do I design My Shop Page using Shop Accordion widget?
- 📄 How do I design My Shop Page using Shop Table?
- 📄 How do I design My Shop Page using Shop Beauty?
- 📄 How do I design My Shop Page using Shop Wix?
- 📄 How do I design My Shop Page using Shop Smart?
- 📄 How do I design My Shop Page using Shop Shopify?
- 📄 How do I design My Shop Page using Shop Minimal?
- 📄 How to Add a Filter Advance in my Shop page?
- 📄 How to Add a Horizontal Filter in my Shop page?
- 📄 How to Add a Filter Vertical in my Shop page?
- 📄 How do I add related products using the Related Products Classic widgets?
- 📄 How do I add related products using the Related Products Flip widgets?
- 📄 How to customize WooCommerce Cart page?
- 📄 How do I create a custom checkout page for my WooCommerce store?
- 📄 How do I create an Image gallery for my products using Image using Gallery LC Litebox?
- 📄 How do I add related products using the Related Products Standard widgets?
- 📄 How to add a product barcode in WooCommerce products?
- 📄 How do I add related products using the Related Products Curvy widgets?
- 📄 How do I add related products using the Related Products Trendy widgets?
- 📄 How to add a menu cart for my website?
- 📄 How do I add related products using the Related Products Accordion widgets?
- 📄 How to add a FAQ section for my website using FAQ Accordion widget?
- 📄 How do I add related products using the Related Products Table widgets?
- 📄 How can I add Sales Notification on my website?
- 📄 How can I add the Shop category section in my Shop page?
- 📄 How can I add a Quick Checkout button in the Single product page?
- 📄 How can I add the Ask For Price button in my single product page template?
- 📄 How to Add Compare button in Single Product page Using Add to Compare widget?
- 📄 How can I add a Thank You message after the order is complete?
- 📄 How to add an Order Pay feature in my Checkout page using the Order pay widget?
- 📄 How do I add a Basic Menu in my shop page header?
- 📄 How to set a pricing table for my website using Pricing Table Advanced?
- 📄 How to set a pricing table for your website using the Pricing Table Smart?
- 📄 How do I set up a My Account page on my website?
- 📄 How do I add a Customer Reviews section to my website using Customer Review Classic?
- 📄 How do I set up a My Account page on my website using My Account Advanced?
- 📄 How do I add a Customer Reviews section to my website using Customer Reviews Trendy?
- 📄 How do I add a Customer Reviews section to my website using Customer Reviews Standard?
- 📄 How to add multiple Tabs in a website's pages using Tabs Classic widget?
- 📄 How to add a Dynamic Tab in your WooCommerce single Product Page?
- 📄 How to Add Gradient Button in my shop page?
- 📄 How do I create an Image Comparison page for my products?
- 📄 How to setup AJAX filter and Auto filter in Filter widgets?
- 📄 How to add Tabs Classic in a website's pages?
- 📄 How to add Tabs Beauty in a website's pages?
- 📄 How to add Tabs Basic in a website's pages?
- 📄 How to add Tabs Fancy in a website's pages?
- 📄 How do I create an Image gallery for my products using Gallery Box Slider widgets?
- 📄 How do I create an Image gallery for my products using Gallery Fancybox widgets?
- 📄 How do I create a single product page for my WooCommerce shop?
- 📄 How to add Tabs in a website's single product page?
- 📄 How to set a pricing table for your website using the Pricing Table Fancy?
- 📄 How to set a pricing table for your website using the Pricing Table Regular?
- 📄 How to set a pricing table for your website using the Pricing Table Basic?
- 📄 How to create a Wishlist page for your WooCommerce shop?
- 📄 How do I create email templates for my customers?
- 📄 Is there an option for infinity scrolling on the shop widgets?
- 📄 How to design email templates with CoDesigner?
- 📄 “Filter Vertical” searching is not working, how to solve this?
- 📄 How to use AJAX filter in CoDesigner?
- 📄 How to create a header with CoDesigner?
- 📄 Where can I find the upsell and cross-sell widgets?
- 📄 Where to use the Ask for Price widget?
- 📄 Why my shop page is appearing in default WooCommerce style?
- 📄 Why product comparison button is not displaying?
- 📄 Why some of the single product widgets are not viewable while customizing with Elementor?
- 📄 How to create a product comparison page with CoDesigner?
- 📄 Why the cart has a slide option in mobile view?
- 📄 How to create a footer with CoDesigner?
- 📄 Are the related products widgets deleted from CoDesigner?
- 📄 How to copy-paste elementor designs across multiple sites?
- 📄 How to create a custom shop archive page using CoDesigner?
- 📄 How do I create a product page that only shows products from one category?
- 📄 Why PREVIEW text is appearing after adding a widget?
- 📄 How can I add new fields in the checkout form?
- 📄 Why image sizes are different in product pages?
- 📄 How can I use pre-made blocks?
- 📄 How to create and edit a new checkout page while keeping the current checkout page live?
- 📄 Is it possible to add CoDesigner checkout in a one page website?
- 📄 Does CoDesigner filter widget work with the regular Elementor Pro shop widget?
- 📄 How to add product categories and subcategories using CoDesigner filter?
- 📄 How to enable floating cart on your shop page?
📂 CoDesigner Shop
- 📄 How do I design My Shop Page using Shop Classic?
- 📄 How can I design my shop page using the Shop Standard widget?
- 📄 How can I design my shop page using the Shop Curvy widget?
- 📄 How can I design my shop page using the Shop Slider widget?
- 📄 How can I design my shop page using the Shop Flip widget?
- 📄 How can I design my shop page using the Shop Trendy widget?
- 📄 How do I design My Shop Page using Shop Curvy Horizontal Widget?
- 📄 How do I design My Shop Page using Shop Accordion widget?
- 📄 How do I design My Shop Page using Shop Table?
- 📄 How do I design My Shop Page using Shop Beauty?
- 📄 How do I design My Shop Page using Shop Wix?
- 📄 How do I design My Shop Page using Shop Smart?
- 📄 How do I design My Shop Page using Shop Shopify?
- 📄 How can I add a Quick Checkout button in the Single product page?
- 📄 How to Add Compare button in Single Product page Using Add to Compare widget?
- 📄 How do I create a single product page for my WooCommerce shop?
- 📄 How to add Tabs in a website's single product page?
- 📄 How to create a Wishlist page for your WooCommerce shop?
📂 CoDesigner Checkout
- 📄 How to customize WooCommerce Cart page?
- 📄 How do I create a custom checkout page for my WooCommerce store?
- 📄 How to add an Order Pay feature in my Checkout page using the Order pay widget?
- 📄 Checkout Builder
- 📄 My Checkout page isn't working
- 📄 How can I add new fields in the checkout form?
- 📄 How to create and edit a new checkout page while keeping the current checkout page live?
📂 CoSchool Configuration
📂 Pre-sales Questions
- 📄 How many licenses does CoDesigner have?
- 📄 Do you provide trial version of pro features?
- 📄 Which plugins are required to make it work?
- 📄 Do I need Elementor Pro to use CoDesigner?
- 📄 How many widgets does CoDesigner offer?
- 📄 What happens if CoDesigner Pro license expires?
- 📄 If I buy a single license can I use it on a domain test and move it on an official domain?
- 📄 Does it allow the customization of WooCommerce addons such as bookings?
- 📄 Are filters based on WooCommerce categories or attributes?
- 📄 Can I upgrade from your personal to the professional license?
- 📄 Do I need to pay again if I want to upgrade my current plan?
- 📄 Do i need to delete the free version before installing CoDesigner pro?
- 📄 What type of custom field for checkout form this plugin support?
How to add a menu cart for my website?
A Menu Cart in WooCommerce provides quick access to cart contents, encourages additional purchases, reduces checkout friction, and keeps the shopping process seamless. Here is the process on to add Menu cart:
Step 1: Install and activate the CoDesigner plugin by navigating to Plugins > Add New.
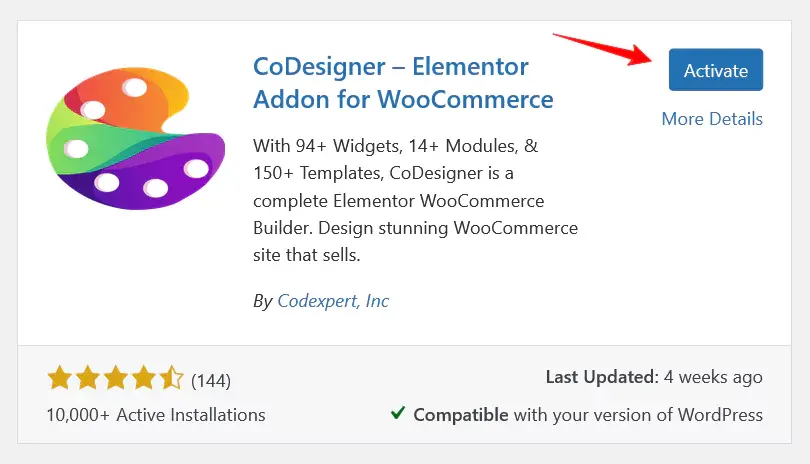
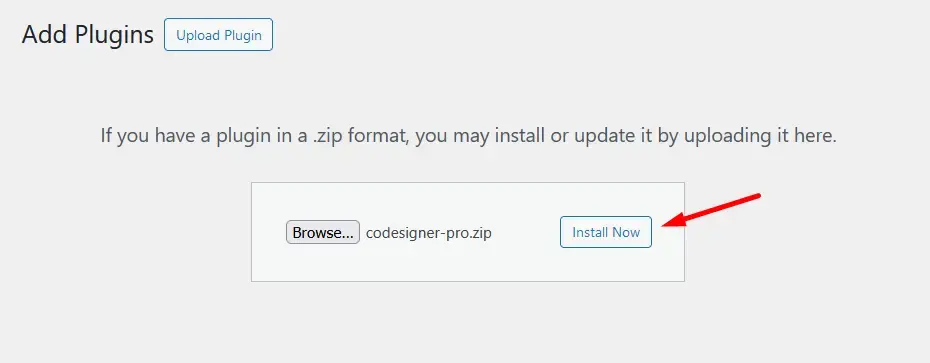
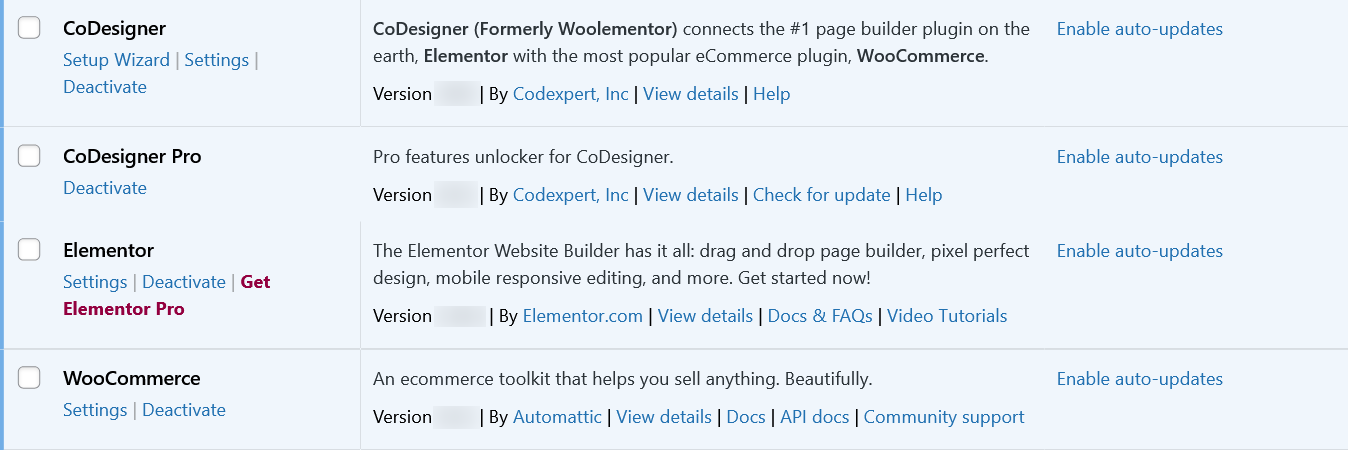
Step 2: You’ll need the Pro version of CoDesigner to use the Menu Cart widget. To do this, Visit CoDesigner and choose a plan to purchase it. Install and activate the CoDesigner Pro on your website.
Step 3: If you don’t have an account to purchase the pro version, it’s easy to create one. Enter your email address, choose your first name, the last name, and create a secure password and payment information. That’s all you need to have the pro version.
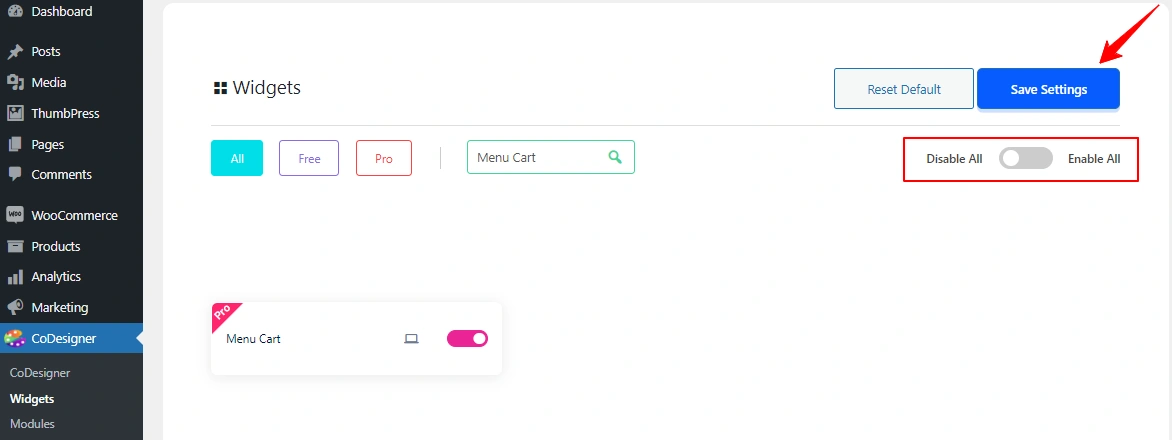
Step 4: After activating CoDesigner Pro License, Go to CoDesigner > Widgets and enable the Menu Cart widget. Then, click the Save Settings button.
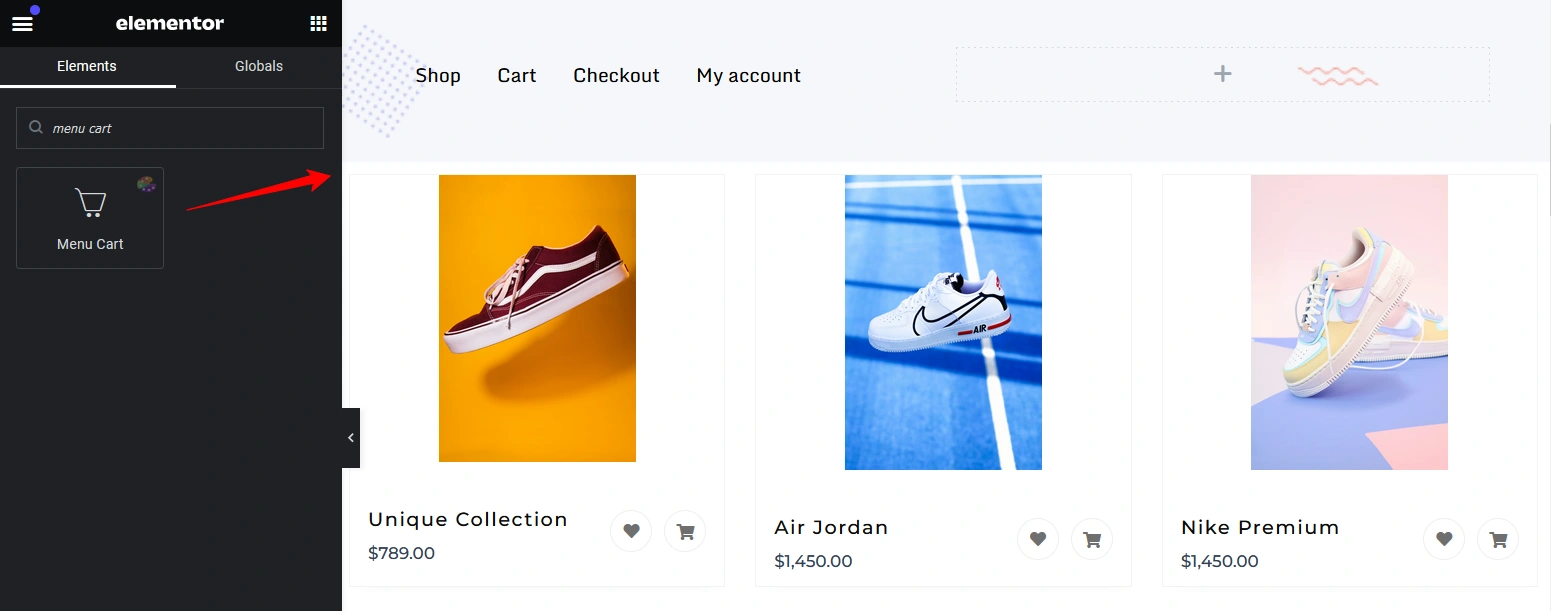
Step 5: Usually, the Menu Cart is set to Header. So, Open your header template in Elementor. After that, search the Menu Cart and drag it to your desired section.
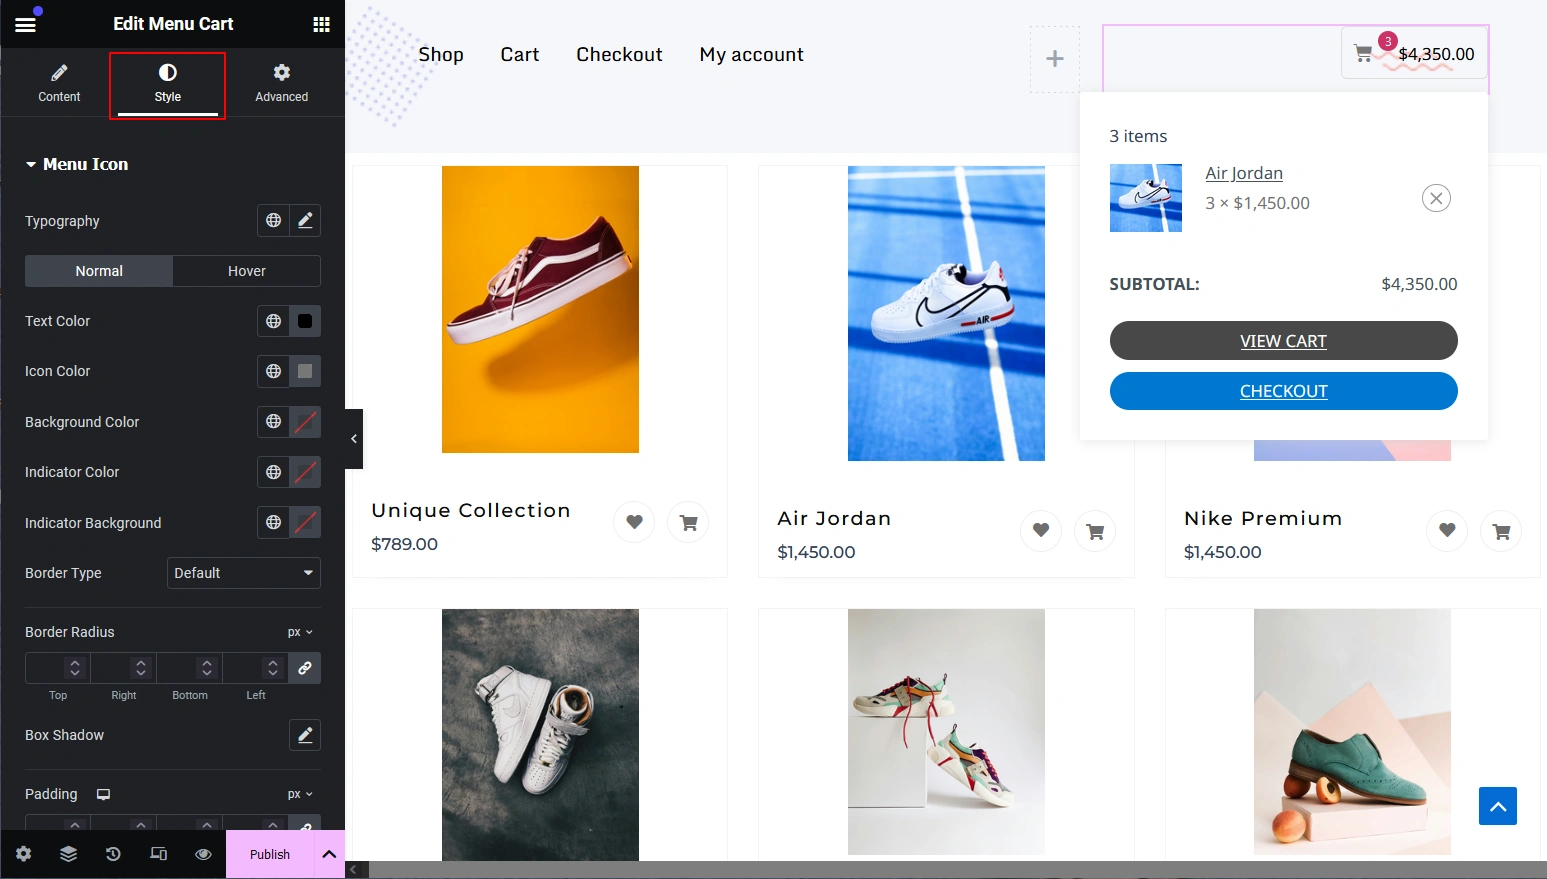
Step 6: Customize each and every section of your Menu cart including the cart items content, View Cart and Checkout Buttons, adjust the size of the cards, etc. Finally, Publish the page to make the Menu Cart live for your WooCommerce store.
Was this doc helpful?


