📂 License
- 📄 Can I use a single license on multiple site at the same time?
- 📄 How do I cancel license renewal?
- 📄 How to upgrade my license?
- 📄 I paid for the renewal but still the notice shows on my site. How to solve this?
- 📄 How can I install and activate CoDesigner and CoDesigner Pro on my website?
- 📄 How to renew my license?
- 📄 I can’t activate my license, what to do?
- 📄 I want to reset my password. How to do that?
- 📄 What happens if my license expires?
- 📄 If I buy a single license, can I use it on a test domain and move it on an official domain later?
📂 Troubleshooting
- 📄 My site doesn't show the update notice, what to do?
- 📄 I can't activate my license, what to do?
- 📄 CoDesigner Pro stopped working and cannot be updated. What to do?
- 📄 Issue with Pagination on Shop Page, what to do?
- 📄 I can’t activate my license, what to do?
- 📄 Elementor editor is loading continuously, how to fix it?
- 📄 My Checkout page isn't working
- 📄 How to create and edit a new checkout page while keeping the current checkout page live?
- 📄 Text are not appearing on Buttons Created using Font Awesome and CoDesigner, what to do?
- 📄 Why am I getting an error message while editing the checkout page with Elementor?
📂 CoDesigner Modules
📂 CoDesigner Customization
- 📄 How do I design My Shop Page using Shop Classic?
- 📄 How can I design my shop page using the Shop Standard widget?
- 📄 How can I design my shop page using the Shop Curvy widget?
- 📄 How can I design my shop page using the Shop Slider widget?
- 📄 How can I design my shop page using the Shop Flip widget?
- 📄 How can I design my shop page using the Shop Trendy widget?
- 📄 How do I design My Shop Page using Shop Curvy Horizontal Widget?
- 📄 How do I design My Shop Page using Shop Accordion widget?
- 📄 How do I design My Shop Page using Shop Table?
- 📄 How do I design My Shop Page using Shop Beauty?
- 📄 How do I design My Shop Page using Shop Wix?
- 📄 How do I design My Shop Page using Shop Smart?
- 📄 How do I design My Shop Page using Shop Shopify?
- 📄 How do I design My Shop Page using Shop Minimal?
- 📄 How to Add a Filter Advance in my Shop page?
- 📄 How to Add a Horizontal Filter in my Shop page?
- 📄 How to Add a Filter Vertical in my Shop page?
- 📄 How do I add related products using the Related Products Classic widgets?
- 📄 How do I add related products using the Related Products Flip widgets?
- 📄 How to customize WooCommerce Cart page?
- 📄 How do I create a custom checkout page for my WooCommerce store?
- 📄 How do I create an Image gallery for my products using Image using Gallery LC Litebox?
- 📄 How do I add related products using the Related Products Standard widgets?
- 📄 How to add a product barcode in WooCommerce products?
- 📄 How do I add related products using the Related Products Curvy widgets?
- 📄 How do I add related products using the Related Products Trendy widgets?
- 📄 How to add a menu cart for my website?
- 📄 How do I add related products using the Related Products Accordion widgets?
- 📄 How to add a FAQ section for my website using FAQ Accordion widget?
- 📄 How do I add related products using the Related Products Table widgets?
- 📄 How can I add Sales Notification on my website?
- 📄 How can I add the Shop category section in my Shop page?
- 📄 How can I add a Quick Checkout button in the Single product page?
- 📄 How can I add the Ask For Price button in my single product page template?
- 📄 How to Add Compare button in Single Product page Using Add to Compare widget?
- 📄 How can I add a Thank You message after the order is complete?
- 📄 How to add an Order Pay feature in my Checkout page using the Order pay widget?
- 📄 How do I add a Basic Menu in my shop page header?
- 📄 How to set a pricing table for my website using Pricing Table Advanced?
- 📄 How to set a pricing table for your website using the Pricing Table Smart?
- 📄 How do I set up a My Account page on my website?
- 📄 How do I add a Customer Reviews section to my website using Customer Review Classic?
- 📄 How do I set up a My Account page on my website using My Account Advanced?
- 📄 How do I add a Customer Reviews section to my website using Customer Reviews Trendy?
- 📄 How do I add a Customer Reviews section to my website using Customer Reviews Standard?
- 📄 How to add multiple Tabs in a website's pages using Tabs Classic widget?
- 📄 How to add a Dynamic Tab in your WooCommerce single Product Page?
- 📄 How to Add Gradient Button in my shop page?
- 📄 How do I create an Image Comparison page for my products?
- 📄 How to setup AJAX filter and Auto filter in Filter widgets?
- 📄 How to add Tabs Classic in a website's pages?
- 📄 How to add Tabs Beauty in a website's pages?
- 📄 How to add Tabs Basic in a website's pages?
- 📄 How to add Tabs Fancy in a website's pages?
- 📄 How do I create an Image gallery for my products using Gallery Box Slider widgets?
- 📄 How do I create an Image gallery for my products using Gallery Fancybox widgets?
- 📄 How do I create a single product page for my WooCommerce shop?
- 📄 How to add Tabs in a website's single product page?
- 📄 How to set a pricing table for your website using the Pricing Table Fancy?
- 📄 How to set a pricing table for your website using the Pricing Table Regular?
- 📄 How to set a pricing table for your website using the Pricing Table Basic?
- 📄 How to create a Wishlist page for your WooCommerce shop?
- 📄 How do I create email templates for my customers?
- 📄 Is there an option for infinity scrolling on the shop widgets?
- 📄 How to design email templates with CoDesigner?
- 📄 “Filter Vertical” searching is not working, how to solve this?
- 📄 How to use AJAX filter in CoDesigner?
- 📄 How to create a header with CoDesigner?
- 📄 Where can I find the upsell and cross-sell widgets?
- 📄 Where to use the Ask for Price widget?
- 📄 Why my shop page is appearing in default WooCommerce style?
- 📄 Why product comparison button is not displaying?
- 📄 Why some of the single product widgets are not viewable while customizing with Elementor?
- 📄 How to create a product comparison page with CoDesigner?
- 📄 Why the cart has a slide option in mobile view?
- 📄 How to create a footer with CoDesigner?
- 📄 Are the related products widgets deleted from CoDesigner?
- 📄 How to copy-paste elementor designs across multiple sites?
- 📄 How to create a custom shop archive page using CoDesigner?
- 📄 How do I create a product page that only shows products from one category?
- 📄 Why PREVIEW text is appearing after adding a widget?
- 📄 How can I add new fields in the checkout form?
- 📄 Why image sizes are different in product pages?
- 📄 How can I use pre-made blocks?
- 📄 How to create and edit a new checkout page while keeping the current checkout page live?
- 📄 Is it possible to add CoDesigner checkout in a one page website?
- 📄 Does CoDesigner filter widget work with the regular Elementor Pro shop widget?
- 📄 How to add product categories and subcategories using CoDesigner filter?
- 📄 How to enable floating cart on your shop page?
📂 CoDesigner Shop
- 📄 How do I design My Shop Page using Shop Classic?
- 📄 How can I design my shop page using the Shop Standard widget?
- 📄 How can I design my shop page using the Shop Curvy widget?
- 📄 How can I design my shop page using the Shop Slider widget?
- 📄 How can I design my shop page using the Shop Flip widget?
- 📄 How can I design my shop page using the Shop Trendy widget?
- 📄 How do I design My Shop Page using Shop Curvy Horizontal Widget?
- 📄 How do I design My Shop Page using Shop Accordion widget?
- 📄 How do I design My Shop Page using Shop Table?
- 📄 How do I design My Shop Page using Shop Beauty?
- 📄 How do I design My Shop Page using Shop Wix?
- 📄 How do I design My Shop Page using Shop Smart?
- 📄 How do I design My Shop Page using Shop Shopify?
- 📄 How can I add a Quick Checkout button in the Single product page?
- 📄 How to Add Compare button in Single Product page Using Add to Compare widget?
- 📄 How do I create a single product page for my WooCommerce shop?
- 📄 How to add Tabs in a website's single product page?
- 📄 How to create a Wishlist page for your WooCommerce shop?
📂 CoDesigner Checkout
- 📄 How to customize WooCommerce Cart page?
- 📄 How do I create a custom checkout page for my WooCommerce store?
- 📄 How to add an Order Pay feature in my Checkout page using the Order pay widget?
- 📄 Checkout Builder
- 📄 My Checkout page isn't working
- 📄 How can I add new fields in the checkout form?
- 📄 How to create and edit a new checkout page while keeping the current checkout page live?
📂 CoSchool Configuration
📂 Pre-sales Questions
- 📄 How many licenses does CoDesigner have?
- 📄 Do you provide trial version of pro features?
- 📄 Which plugins are required to make it work?
- 📄 Do I need Elementor Pro to use CoDesigner?
- 📄 How many widgets does CoDesigner offer?
- 📄 What happens if CoDesigner Pro license expires?
- 📄 If I buy a single license can I use it on a domain test and move it on an official domain?
- 📄 Does it allow the customization of WooCommerce addons such as bookings?
- 📄 Are filters based on WooCommerce categories or attributes?
- 📄 Can I upgrade from your personal to the professional license?
- 📄 Do I need to pay again if I want to upgrade my current plan?
- 📄 Do i need to delete the free version before installing CoDesigner pro?
- 📄 What type of custom field for checkout form this plugin support?
How to create a footer with CoDesigner?
CoDesigner also lets you create a custom footer for your site. In our previous documentation, the steps for creating a header with CoDesigner were demonstrated.
Now, we will see the steps to create an eye-catching footer with CoDesigner –
1. Go to WordPress dashboard and click on “Templates”

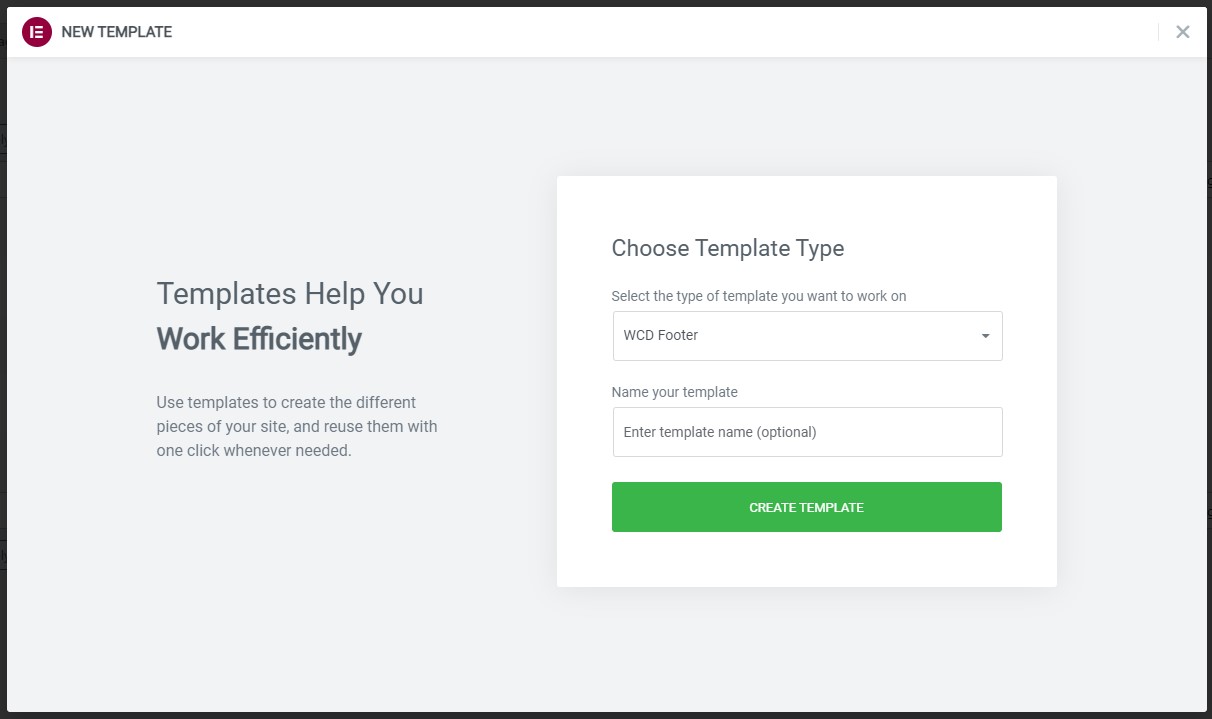
2. Press the “Add New” button and select “WCD Footer” on the pop-up screen.

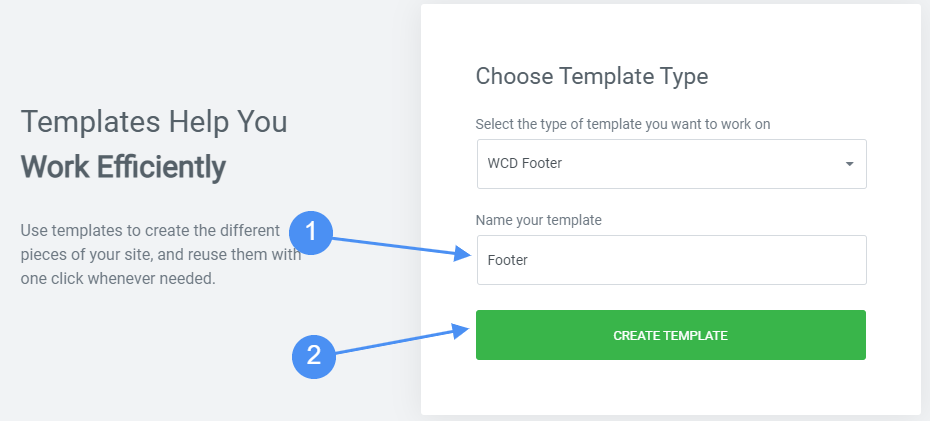
3. Give your template a name and then press the “Create Template” button.

4. After giving a name to your template, you will be automatically redirected to an Elementor editor page. Here You will need to add sections to start creating a new footer. For example, I’m adding 2 sections to the template.

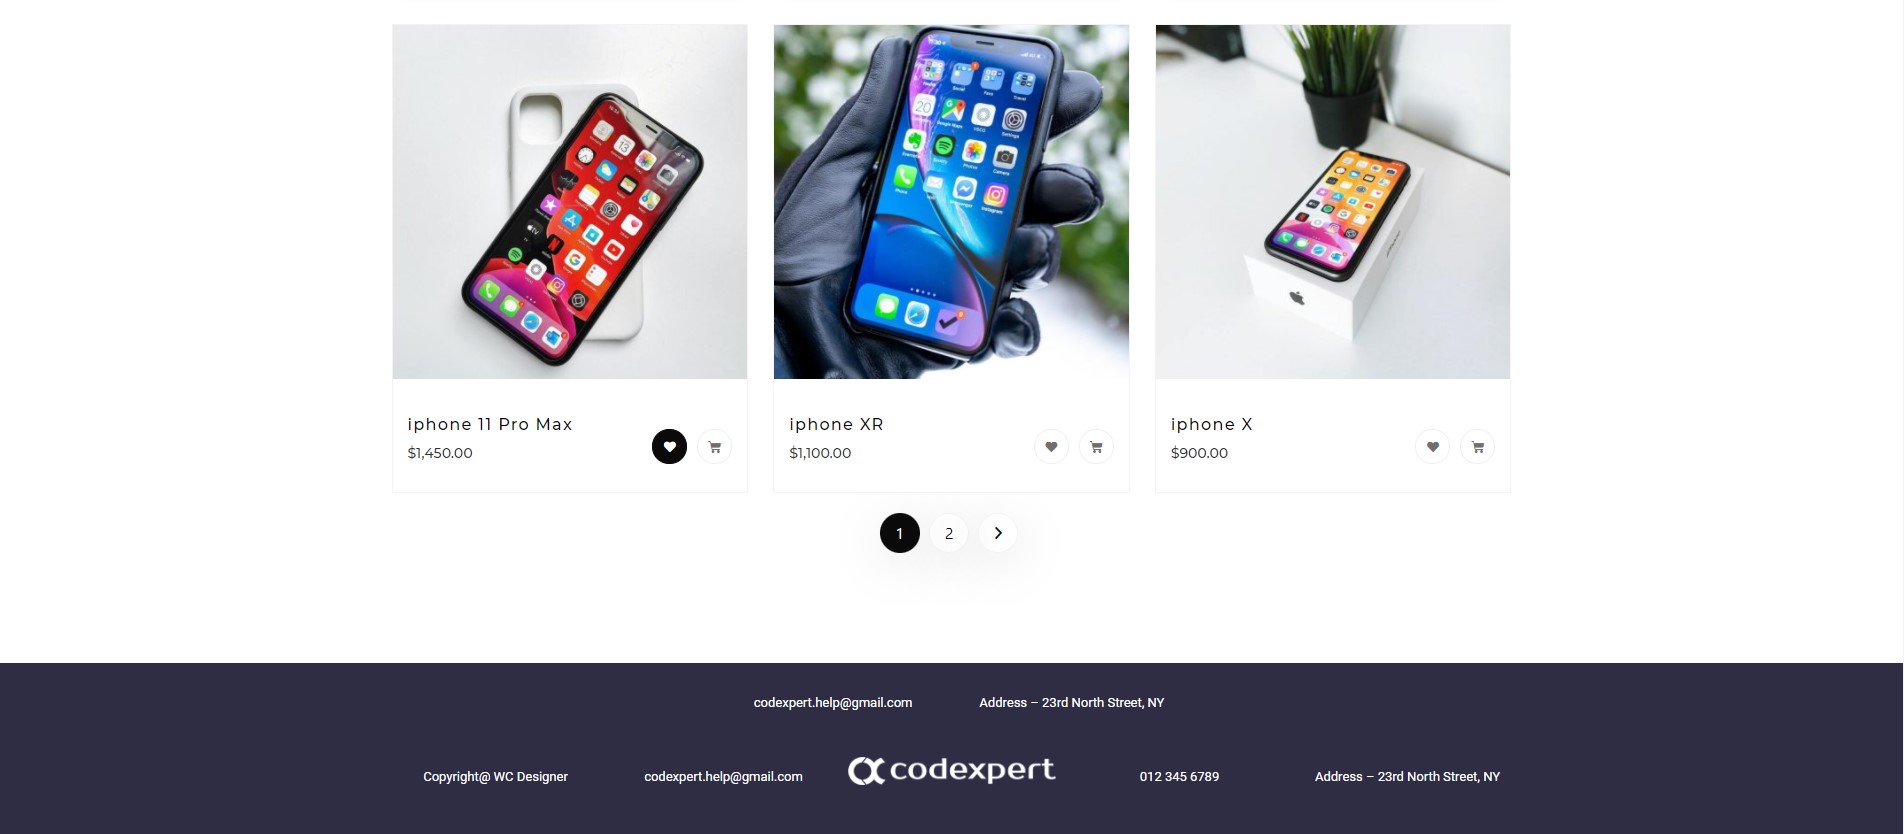
5. Now, I will add 2 columns in the first section and 5 columns in the second section. In the columns of the first section, I have added the demo email and address. In the second section, I added the logo in the middle and 2 demo contents on each side of the logo. You can add your preferred content to create the footer.

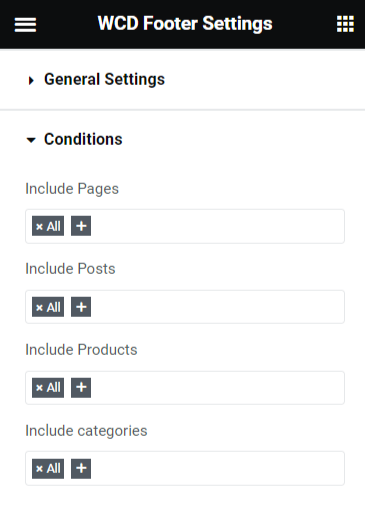
6. After making the changes, I set conditions for the footer to display on all types of pages, posts, and products. You can also make it appear on any particular page, post, product, or category.

Now, I will publish this new footer and the final outlook of the simple footer is shown in the screenshot below.

Was this doc helpful?

